Wednesday, August 18, 2010

Absolute Simplicity


Yarn: Dream In Color Smooshy,
color -Absolute Magenta 2.25 skeins.
Needles: US #2, US #6.


After working on "High Sea," a lace stole that required a lot of attention. a simple mindless knitting was in order. I came up with this sweater that was all st st except for neck and sleeve edgings, and very minimum increases/decreases, only 3 rounds of decreases, one on the neck edge, one on each sleeve.

Talking about super easy, I got to watch movies with subtitles while knitting this!
It was knitted from top down. with the same width at top as it was at armpit. The narrowing of neck was done by pleating at the very end ( it took about 5 minutes to do the pleating)

I ended up with a bit too long of depth from neck to armpit, so after I finished the sweater I cut off an inch from top and pick up stitches from there. Realizing the stretchiness of the knit fabric is making the neck a bit wider than I'd prefer even with pleating, I decreased 10%, also switched to smaller needles to finish the neck edge.

The neck edge and the sleeve edges were done with 3 rows of seed stitches, and the bottom edge was folded over hem, while the rest of the body was nothing but st st.

I wrote down my notes for this sweater (except I modified the CO from what I actually did to what I would do the next time.)

Since this is as easy as it gets, I thought I'd also write down how the CO numbers and sts for dividing sleeves from body were calculated so it can easily be modified for different size and different yarn gauge.

I began with the measurements of bust and upper arms and gave it 2" positive ease to body and 3" positive ease to each sleeve. And of course the gauge of my swatch.

38" bust, 12" upper arm, 2" ease for body, 3" ease for the bust and each arm.
gauge: 5.5 sts = 1"

For CO sts numbers :
  • 38 (bust) + 2 (ease) + 12 (right arm) +3 (ease) +12 (left arm) + 3 (ease) = 70 (width in inches at neck and at armpit right before sleeves separating from body.)
  • 70 (width) x 5.5 (gauge, sts per inch) = 385 (number of sts at armpit)
  • I rounded it down to 380 knowing I get a lot looser as I knit so might as well round it down a little.
  • Then, 380 (number of sts at armpit area) - 40 (total number of CO and pick up sts at the armpit area when sleeves are separated from body) = 340 (number of CO sts.)
  • That's the CO number.

When dividing up sleeves from body:
Sleeves:

  • 12 (upper arm measurement) + 3 (ease) = 15 (width of sleeve in inches)
  • 15 (width) x 5.5 (gauge) = 82.5 (number sts for each sleeve after adding on the pickup sts. rounded it down to 82)
  • 82 (sts for each sleeve) - 10 (sts to be picked up and added on as seam to body.) = 72 (number of st for each sleeve to be put on waste yarn when separate sleeves from body.)


Here are my notes:

Yarn: I used sock yarn (Dream In Color Smooshy, color - Absolute Magenta. Love the color, not crazy of the yarn quality) for a very drapey fabric using needle #6. I can also see using sport weight yarn. Keep in mind the pleats add bulk to the neck area, so heavy yarn may not be ideal.
2.25 skeins = 1012.5 yards
Gauge: 21st = 4" (row count does not matter much here.)
Needles: US #2, and US #6
Size: 40.5" (with 2.5" positive ease)


CO and Upper Body:
Use provisional CO method and CO 340 sts with larger needles.
Join round, and place 1st marker at the beginning of the round.
K half of the total sts (170 sts,) place 2nd marker, k to end.
K all rounds until it measures about 8 1/2" (try it on to see what depth suits your body. It's better too long than too short. Because of the provisional CO, you can always rip back if it's too long.)

Put sleeves on waste yarn and join front and back in round:
K to 2nd marker, put 72 sts (number of st for each sleeve to be put on waste yarn) on waste yarn, use backward loop method and CO 10 sts, K to 1st marker.
Put 72 sts on waste yarn, use backward loop method and CO 10 sts. K to end.
K all rounds until 12" or whatever length desired.
P 1 round.
K 8 rounds.
BO round. You can either BO all sts then fold along the purl round and sew the hem to the back. Or, use another circular needles and pick up the back of sts of 8th row above the purl round and BO by k1 st tog with 1 pick up st and pass over the next k 1 tog with 1 pick up st.

Sleeves (I used two circular needle method to work in round, you can do 4 dpn, or shorter circular needles or magic loop):
Pick up 10 sts from the CO sts at the armpit and slip the sts from waste yarn on to the needles. Place a marker between the 5th and 6th pick up st to indicate beginning of round.
K all rounds for 6"
Next, make decrease and work 3 rounds of seed sts by:
round 1: (k1, p1) 6x, (k2tog, p2tog) 14 x, k2tog, (p1, k1) 6x. - 53 sts total. (note this is essentially the first 1/6 of the sts are worked evenly in seed st without decrease, then k2 tog, and p2tog in every seed st, to the last 1/6 of sleeves, then work the rest without any decrease again.)
round 2 : *p1, K1 rep from * to last st, p1.
round 3: *k1, p1, rep from * to last st, k1.
BO all sts

Neck:
Use smaller needles and pick up all sts from provisiional CO.
Begin seed st, at the same time, decrease 1 st every 11 st by:
*(k1, p1) 4x, k1, p2tog, rep from * to last 10 sts, (k1, p1) 5x.
Next round: *p1, k1, rep from *
Next round: *k1, p1, rep from *
BO all sts tightly.
note: the reason I'd pick up sts and make decrease at the end instead of work the neck edge at the beginning is so that I can see if I want to adjust the decrease numbers. Also, so I can bind it off tightly.

Blcok the sweater.

Sewing Pleats:
Mark the 4 spots along neck edge that are directly above where sleeve separates from body at the armpits. Measure 2" to either side, fold the fabric towards the mark and then again fold it away to create pleats. Sew along the top edge to secure the pleats.
Sew on the buttons right on the pleats.

Wednesday, August 11, 2010

Hiking To the Waterfall

Summer here at Tahoe basin is not my favorite. The weather is lovely, but everywhere you go, it's crowded with people. This town's economy depends on tourism no doubt. I hate to bitch but sometimes the behaviors of some tourists can really foul the mood. We are all trying to do our best not to let a few bad behaviors making us the rude and unwelcoming locals. But we'd also appreciate it if some tourists can refrain from the mentality of "I spent the money, therefore I can treat you like sh#t."
Here are the things that really bother me:
1. People who party really late out on the balcony/backyard when they renting a house in residential neighborhood. Sorry, some of us still have to get up and go to work and you being a loud drunk really makes it hard to fall asleep.

2. Tossing cigarette butts. WTF? we just had a huge fire two years ago that burned down hundreds of houses. Seriously, why every year some tourist had to toss a cigarette butt out the Gondola at Heavenly and started a fire? Few years ago, my neighbor had to put out a fire that just started right by her house and called the FD. We live right night to the forest land, and I cannot tell you how many cigarette butts I'd spot in summer. What's really horrible is the day after July 4th, our beautiful beaches are littered with trash. Some people come to this pristine, beautiful land just so they can trash it.

3. Leaving trash out. We have serious bear problems (it actually should be called human problems.) That is why there are bear cans at every house for trash days. You must put your trash into these cans and lock them so your trash won't attract bears. The problems with bears learning to depend on human trash for food is that if a bear get spotted 3 times it will be put down. You are killing the bears by leaving your trash out. I'm always shocked at the amount of trash tourists have for a weekend stay at the vacation house next to ours. Every unit in our area has huge bear proof trash can. Paul and I usually have one bag of trash each week that doesn't even fill up 1/3 of the capacity. Yet when the vacationers stayed for 3 days,their trash would always be overflowed which means they couldn't close the bin and that completely defeated the purpose of bear proof. How can people create that much trash in such a short time???

4. Driving like complete idiots. OK, so these people probably drive like this at home, but that's no excuse. You DON"T stop in the middle of the road just because you are lost!!! You don't block 2 lanes just because all of sudden you realize this is where you should turn left!!! Please drive the speed limit. When it says 35 mph, please don't drive 5 mph on the fast lane because you're sightseeing. Some of us actually have to go to work.

End of rant.


Summer here means people. Even when you go for a hike you can't avoid running into endless numbers of hikers. That's why I prefer Hope Valley. When I think of paradise on earth, hope valley is pretty close to it. It's right outside of the Tahoe Basin and absolutely stunning in its landscape. I always prefer going there and around Carson Pass area than staying at the basin.

I've been going crazy trying to wait for phone calls that never came about some medical results. It has been endless run around on the phone. I couldn't stand it anymore so we went for a drive yesterday. I just wanted to go hang out by the creek near Markleeville Hot Spring.

There was a little delay because of the summer roadwork on 89. Fortunately we didn't have to wait too long.

Whenever I drive through Hope Valley area, I just feel all the stress and worries washed away from me.

We hiked out to the creek from the Hot Spring parking lot. After hanging out on the rock for a while we decided to hike upstream in the water. That was a bit challenge in my flip flop. We did that for about ten minutes, then swtiched to our hiking boots and hiked back on the trail through the woods. Then we just followed the trail to "Waterfall." Somewhere new for us.

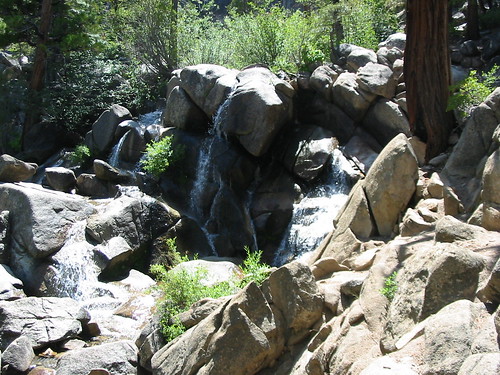
It was such a pleasant and super easy trail. The trail was flat most of the way until the last small section of hiking up rocks to get to the small waterfall. It was a charming waterfall. Unlike Cascade or Eagle falls over at Tahoe Basin's Desolation Wilderness, this was a small scale but with little pools of water as it falls down in sections.

We were both glad to have gone for the hike. It was only 1.5 miles each way. But just what we needed for some de-stress.


Wednesday, July 28, 2010

Foggy Evening


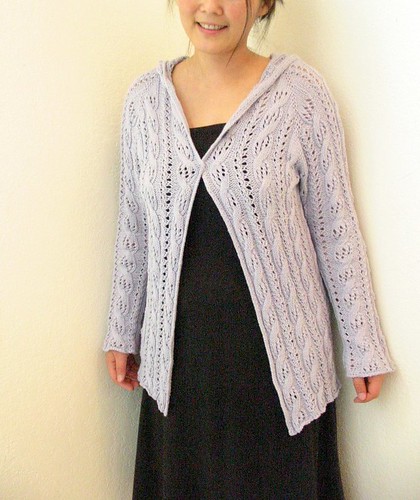
For a while I'd been thinking about a lacy hoodie with some cables. I know, it sounds like a potential overload of too many elements. I'm always wary of a knitwear that sacrifices design elements for sheer show-off of technical complexity.

I put the idea aside since I'd not found any yarn that is a good fit for the idea. The thought of pure wool for summer wear makes me sweat. A heavy cotton and lace just seem like a recipe for endless stretching. When Elann offered this Limited Edition Coto-Merino, I was so excited. I figured this may just be the perfect yarn for the lace hoodie, It has the right weight (sport/light DK) and the color I imagined - light gray, and the right fiber combination of 70% cotton and 30% wool. Perfect. To top it all, the price was amazing - $1.98 each 50g ball. Really, you cannot find a better deal than this.

When I got the yarn in mail, I was delighted with the quality of the yarn.

I did some swatching for the cables, I added some lace to the cable stitches. After a little tweaking here and there I came up with a very easy lacy cable stitch. I wouldn't be surprise if there is already such a stitch existed in a stitch book. (BTW, that is one thing I'd love to get better at - designing lace stitches. I so admire designers that come up with really beautiful lace stitches.) For the design, I decided to alternate the lacy cable with a narrow lace column and purl sts in between as the basic overall fabric.


Yarn: Elann Limited Edition Coto-Merino
Needles: US #4


The construction of the hoodie couldn't be any simpler.
It was knitted top-down beginning at the hood. The hood itself was a basic retangular shape. Then the raglan sleeves. I have to say I love raglan so much. Not only is it so easy to figure out (compare to say the slightly more complex set-in sleeves,) I also found it to look the best on my wide shoulders. I can easily make all my sweaters with raglan sleeves and be happy.

Originally thinking of a regular length , I decided a tunic length will give it a bit more feminine touch to go with the lace. Somehow I always associate hoodies with more a "dude" look. It must be all the snowboard bros wearing them in a baggy fashion. And no, I don't wear hoodies when I board. I got called "dude" enough times on the slope that I'd actually bought myself a down jacket in a lovely apple green color.

Since the sweater already has too many elements in it, I scratched the idea of ribbing for the front edging and simply crocheted single chain st along the edges to give it a neater finish and blocked the sweater well.

I really like how the sweater turned out. It evolved from my rather fuzzy plan into something even better than what I'd expected. My plans always tend to be pretty fuzzy. They usually began with some general structure and stitch ideas and open to changes. In fact, I think about changing my ideas all the time when I make my own design. I consider that "process knitting." This is where I have different idea about "process knitter" from other knitters. I'd read in so many ravelry posts that people consider a process knitter as someone who loves the joy of starting a project more than finishing it. However, because of my study in painting, the idea that an artist is about "process" usually means he/she is in tune with what is happening on canvas at all time and he works by responding to the canvas at all time. That is not the same as starting many paintings for the pure joy of painting and not see any of them through. A Process oriented artist means the artist is not guided by a strict plan or a fully conceived idea (one may even venture to say nor by subject matter) but rather by visual responses to both the image on canvas and to the medium/material. Jackson Pollock is an example of process painter.

Speaking of the medium, the yarn did not disappoint at all. My only regret was that I didn't get more of it. I love it for a summer evening garment.

I name it Foggy Evening because the color reminds me of the common sight of fog rolling in at night in S.F. and Santa Cruz. Places that were so special in my life, and sadly I cannot live there any more. Not just because of my life path, but these places are not the same as they used to be. The dot com explosion had fundamentally changed the cities, and it's so painfully obvious for someone like me who left there 12 years ago and thought I'd move back there as soon as I finish my graduate school, but found it hard to return. It's sad to find that once you move away, you cannot afford to return both financially and mentally.