Yarn: Elann Sock It to Me 4 ply, 4 balls of Mineral Blue, 5 balls of Chestnut
Needles: #2
Needles: #2

an example of plaster carving I saw in Morocco
Lately, I've became obsessed with working with colors. I mean more than one color in each project. After the "Blue Lotus" I became addicted to making my own motifs. So I had in mind of a motif that reminds me of geometric design in Islamic Art. I love, love, love Islamic art and architecture. Looking at the intricacy and interwoven pattern I'd often feel a surge of emotion and a sense of sublime. I'm always haunted by the beauty in their designs. They are brilliant examples of how moving abstraction can be without going through imagery and tap directly into our emotions. It's not only the designs alone, it's the combination of that and the material, and the environment, and the space they occupied.
It took a few try to get the design right. To figure out the motif, I cut out little squares of paper and arranged them around on the table to work the positive/negative space and design. Using Excel made designing a lot easier than on graph papers. First swatch was done in blue and light gray. I wasn't as thrilled with the low contrast of the two colors, and the design obviously needed some more work too.

Blue and Gray that didn't work out.
I decided blue (it actually has some teal in it, more like robin's egg blue) and brown would make a good combination, soI went ahead and ordered the yarn from Elann.
Call me crazy, but I knew I wanted to do steek. Even though I'd done it before, but that was over a decade ago. It was my very first knitting project and with beginner's luck and beginner's ignorance, I wasn't even nervous and everything worked out well. This time around I secretly enjoyed the nervousness and the thrill of unknown.
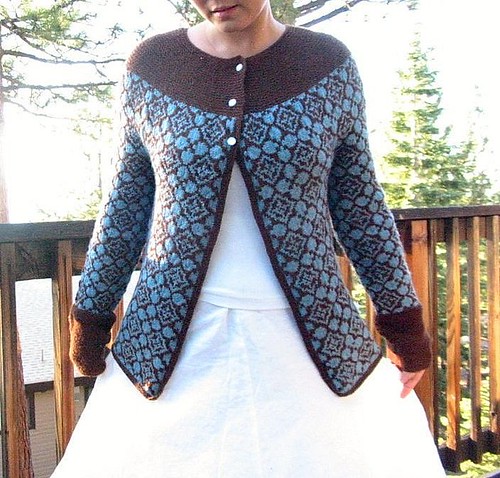
Provisional cast on was used because I really wasn't sure about how I wanted the hem to look. Even though the knitting took a long time, but its progress was satisfying. All along I had this vision of a fitted set-in sleeves with brown shawl collar. But as I was getting closer to the armhole part I became more and more uncertain. Part of it was my little confidence in figuring out the set-in sleeves and how to decrease it with steek lines. One morning I woke up with the brilliant idea of doing the yoke in contrasting color. That solved my dilemma. Looking at the sweater, I am very pleased with that decision because I like the look, and most of all it was a lot easier to make. For once, I feel pretty smart.
The cardigan was made in the round, both the body and the sleeves. Then joined together. The decrease was done mostly on the solid color garter st yoke area, so not much brain work there. It was seamless knitting. The only sewing I did was the armpit area using kirscher's stitches.
The steeking was rather anticlimatic. Sewing the lines, and cutting all went smoothly. Not that I'm complaining or anything, but aftern all the anticipation, it was done before I knew it.
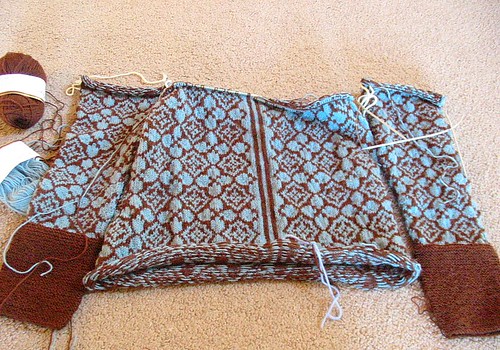
Body and Sleeves before joining

Coninnued 5" in pattern aftern joining body and sleeves

Looking at the steek lines

View of the back with machine sewn in lines to secure yarn before cutting
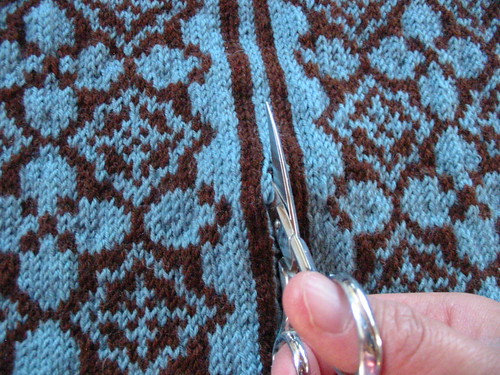
Cutting the steek
Blocking colorwork knitting is like playing magic. It can transform an awkward looking puckery sweater into a beautiful one.
I love the sweater. The part I'm most proud of is how cheap I was able to pull it off! I only used 4 balls of Elann Sock It To Me 4 ply in Mineral Blue, and 5 balls in Chestnut. That came out to be $20.70 Then the buttons were 6 for $1 at Joann's and I only used 3. I feel so smug about making a nice FO with tiny budget. The yarn was no cashmere or soft merino, but it is sturdy and does the job well. It is actually kinda sticky which I may not normally liked but for a stranded colorwork knitting, it's great. I'd made the Don Quixote mittens with it before. The great thing is I can wear it against skin without feeling scratchy since it's superwash. When I make another stranded work I'll definitely consider this yarn again.
Call me crazy, but I knew I wanted to do steek. Even though I'd done it before, but that was over a decade ago. It was my very first knitting project and with beginner's luck and beginner's ignorance, I wasn't even nervous and everything worked out well. This time around I secretly enjoyed the nervousness and the thrill of unknown.
Provisional cast on was used because I really wasn't sure about how I wanted the hem to look. Even though the knitting took a long time, but its progress was satisfying. All along I had this vision of a fitted set-in sleeves with brown shawl collar. But as I was getting closer to the armhole part I became more and more uncertain. Part of it was my little confidence in figuring out the set-in sleeves and how to decrease it with steek lines. One morning I woke up with the brilliant idea of doing the yoke in contrasting color. That solved my dilemma. Looking at the sweater, I am very pleased with that decision because I like the look, and most of all it was a lot easier to make. For once, I feel pretty smart.
The cardigan was made in the round, both the body and the sleeves. Then joined together. The decrease was done mostly on the solid color garter st yoke area, so not much brain work there. It was seamless knitting. The only sewing I did was the armpit area using kirscher's stitches.
- I knitted the body first, then the sleeves. Body began with provision CO and started the pattern immediately after first round. 14 repeats of pattern around. 6 for the front, 6 for the back, and one at each side for later armpit sts that will match sleeve armpit sts. The sleeves began with about 6" of garter sts in brown then changed to pattern. Also some shaping in the sleeves that a full repeat of pattern across after all increases were done. They are stopped at the same row of the pattern and put on waste yarn.
- Then joined the body and sleeves together with one pattern repeat on the side seams of sleeves and body on holder for later armpit join. Because exactly one pattern repeat on hold for each side of body and each sleeve, the knitting across was easy with pattern continuing around smoothly with no change to pattern.
- Continued evenly in pattern for about 5".
- On the last few rows of the last pattern I strategically put in decreases into each pattern repeat. Then put stitches on waste yarn.
- The scary part began: Machine sewing lines before steek, cutting steek.
- For the front and bottom hem: pick up sts along front and the bottom (provisional CO came in handy,) and back up the other front.
- Few rows of garter sts. The hems are done.
- Then the yoke part took me only two days.
- I picked up sts from waste yarn and worked back and forth, making 22 sts decrease every 8 rows (or something like that, I kinda improvised as I went.)
- It ended with about 4" of garter rows in brown.
- All that left was stitch together the armpits and sewn in the buttons, and weave in the ends.
The steeking was rather anticlimatic. Sewing the lines, and cutting all went smoothly. Not that I'm complaining or anything, but aftern all the anticipation, it was done before I knew it.
Body and Sleeves before joining
Coninnued 5" in pattern aftern joining body and sleeves
Looking at the steek lines
View of the back with machine sewn in lines to secure yarn before cutting
Cutting the steek
Blocking colorwork knitting is like playing magic. It can transform an awkward looking puckery sweater into a beautiful one.
I love the sweater. The part I'm most proud of is how cheap I was able to pull it off! I only used 4 balls of Elann Sock It To Me 4 ply in Mineral Blue, and 5 balls in Chestnut. That came out to be $20.70 Then the buttons were 6 for $1 at Joann's and I only used 3. I feel so smug about making a nice FO with tiny budget. The yarn was no cashmere or soft merino, but it is sturdy and does the job well. It is actually kinda sticky which I may not normally liked but for a stranded colorwork knitting, it's great. I'd made the Don Quixote mittens with it before. The great thing is I can wear it against skin without feeling scratchy since it's superwash. When I make another stranded work I'll definitely consider this yarn again.
This sweater is absolutely gorgeous! I really love it. Thanks for describing your process so thoroughly.
ReplyDeletethis is beautiful! Are you going to publish the pattern itself anywhere?
ReplyDeleteAre you gonna make me one for xmas?
ReplyDeleteWow--this sweater is simply gorgeous! I think the contrasting color yoke was genius! Well done.
ReplyDeletewow i love your sweater is there any way to buy the pattern Jane
ReplyDelete