Yarn: Elann Peruvian Baby Cashmere, color: pewter, cahsmere blue
Needles: US #2
This tunic took me a lot longer than usual. I was bored after I finished the front. It was knitted in all st. st with fingering weight yarn. I was excited about the concept, but the execution was slow. It was also interrupted by other unexciting things going on in life. First, I got really busy trying to wrap up the end of semester, all the grading and critiques. Soon as the semester ended I drove down to Bay Area to get a tooth pulled. Fortunately even without any dental insurance I get all of my dental work done for free. My older sister is a dentist and her husband specializes in endodontis. I even had a total painless root canal done last year, painless both physically and financially. My sister did the crown and all that for free as well. She is like that, extremely protective of our family and always make sure that we're all OK and would never accept any payment from us at all even if I ever become a millionaire.
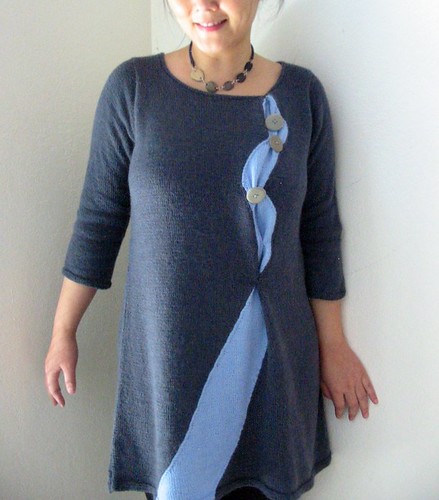
The concept of this sweater design was formed when I was working on the red Lichen II. The idea of placing stone buttons as river rocks popped into my head and I knew I'd want to make it one day just to see if it works at all even if it sounds a bit cheesy.
I used Elann Peruvian Baby Cashmere in color pewter and cashmere blue. I love this yarn, it's true to the claim, luxury at affordable price, very very soft.
To do the intersia of big blocks of color I had to knit it in flat pieces of the front and back. They were knitted from bottom up. The front was completely done in improvisation as I knitted. I knew what general shape it would be but as when to make curves was decided as I knitted. The front and back were joined at the shoulders and at the sides. Sleeves were knitted top down in round from the picked up stitches around armholes.
This tunic went through few transformations. Most of the mistakes and corrections were done out of laziness. The end result actually is not too far from what I originally envisioned. But during the knitting coupla things didn't work out right. First, the neckline ended up being way too small from I wanted. But stubbornly I refused to rip it back because I was getting bored with knitting it and thinking it would be fine. The second mistake was when I decided to make it short-sleeve even though I had longer sleeves in mind all along. If I have to be very honest, I think that decision was again out of being lazy and getting bored with the knitting. But I convinced myself it was for the design proportion to go with the smaller neck opening. After the first sleeve was finished, I knew I truly should've ripped back for larger neck opening at the first place and make the sleeves longer, it was just looking awful otherwise. However, because the sleeve was picked up stitches along armhole and knitted top-down, I'd have to rip back the sleeve and the neck area of body to make it right, and that would mean a lot of re-knitting. Well, what's a lazy, unmotivated person to do? The answer: come up with a different solution instead of re-knit. My solution was to go ahead and knit the other sleeve longer to make sure the long sleeve is the way to go, then go back and lengthen the first sleeve. As to the neck opening, well, I can machine sew stitches around the opening before cutting it to the size I want, then pick up stitches to knit and finish the neck line. So that was exactly what I did. Along the neckline I did 2 rows of st st before I used applied I-cord edging to finish it. Blocking helped keeping the neckline edge from rolling which would show the frayed ends from cutting.
 |
Before lengthening first sleeve and cut neck opening
A round of running stitches were hand sewn to indicate
where to machine sew and cut the new neck opening.
After some changes in placement of stone buttons. I also added some gathering to give the area some texture.
I played with the placement of stones and the gathering for quite a while, sewed and ripped, sewed and ripped. I made least 20 trips to the bathroom mirror to check how it looks. I like the sweater so much more after the details were set.
The reason I wanted a wide neckline at the first place was so that I could make a necklace to go with it. Yes, it may be overkill but this girl loves some bling every now and then. I found the stone links at the same stores I got my stone buttons, and used the same yarn to crochet the cord.
Now I'm just glad it's all done so I can move on to some quicker knitting.


